Of course, you can let your olive tree grow as Mother Nature intended. Sooner or later you will regret this decision, because the Mediterranean shrub is growing too much for you. Then an olive tree bursts all dimensions, especially in its winter quarters, because planted in the garden it rarely survives in central European latitudes. If, in view of the bizarre habit, doubts arise as to whether you, as a hobby gardener, are up to the requirements of pruning, the following lines should be of interest. Well-founded instructions explain when and how to prune your olive tree correctly. In the end you will be surprised how uncomplicated the procedure is.
Table of Contents
Characteristics
- Genus of olive trees (Olea)
- Species Name: Olive Tree (Olea europaea)
- Native to the Mediterranean, Middle East and South Africa
- Evergreen, not hardy deciduous tree
- Varietal-dependent growth height outdoors from 10 to 20 meters
- Average height in tub culture between 4 and 6 meters
- Annual growth 10 cm to a maximum of 30 cm
- White-yellow flowers in April and May
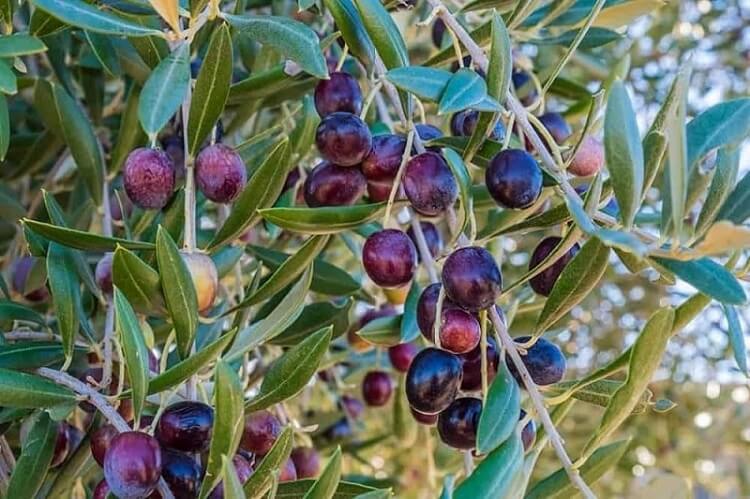
- Black or dark purple drupes in autumn
The initially green, later dark olives are not suitable for consumption directly from the tree. The high content of bitter substances must first be flushed out using a complex process. Therefore, almost 90 percent of the world’s olive harvest is processed into high-quality cooking oil. In commercial cultivation, olive trees are subject to regular pruning to increase crop yields. The smaller and gnarled the tree, the richer and more valuable the harvest.
Best time in spring
A mild spring day is recommended for the central pruning. The olive tree has left the stress of cold and dark winter days behind and is preparing to sprout again in the open air. Anyone who expects their Mediterranean shrubs to be pruned back in autumn will also be weakened by the hardships of overwintering. Even in an air-conditioned conservatory, there is simply not enough light and heat to meet the natural requirements of an olive tree. In order to survive this phase in one piece, the tree needs all the reserves that it was able to build up over the course of the past summer. Once the climatic valley has bottomed out in spring, there is nothing more to say against a shape and maintenance cut.
Remove diseased branches quickly
The situation is different if an olive tree develops diseased, stunted shoots. In this case, immediate intervention is required by cutting such parts of the plant without delay. This also applies if branches are broken after a summer storm. Any damage to the bark opens the door to fungal spores, viruses and pests and should be treated immediately. Cuts, which are inevitable in this context, are sealed with charcoal ash. Only wounds with a diameter of more than 5 cm should be treated with a wound sealant, and only along the edge. If an infected or destroyed shoot needs to be completely removed, cut up to the branch ring without touching it.
Correct incision in shaping
All individual cuts are entwined around a central attribute in growth: An olive tree always develops a main shoot with outgoing main branches, which in turn carry the young shoots. Before starting work, it is important to define this main drive. If you cultivate the olive as a shrub, some main branches are intended as additional main shoots. In order to create a harmonious, semi-circular crown, the central shoot should always be the longest.
- Shorten the main shoot only minimally
- Shorten the main branches uniformly all around
- Set up a template for orientation or lay out ropes on the floor
- Completely remove all downward branches
- The young shoots on the main branches may be shortened the most
- For each cut, position the scissors at a slight angle about 3 mm above an eye
- No bud or leaf node should point into the crown interior
Since an olive tree only grows slowly, pruning mistakes that happen quickly in the heat of the moment are visible for a long time. It is therefore advisable to proceed in several stages. Take a few steps back from time to time and examine the result so far. A recut was done quickly. It is important that at the end the last eye of a shoot always points outwards. Holding the cutting tool at a slight angle is important for keeping the tree healthy. The rainwater can run off better, which effectively prevents a fungal infection.
Sequence of topiary
In view of the slow growth of the olive tree, one or the other hobby gardener might be tempted to do without an annual cut. In principle, there is nothing wrong with a three-year cycle. Despite this, experienced olive tree gardeners advocate maintaining an annual sequence. If the tree is left to its own devices for several years, compaction, dead areas and exhausting shoots increase. This circumstance in turn requires a much more drastic intervention in the growth than with an annual routine. If you prune the olive tree a little every spring, you will also be rewarded with lush branching. If you record a regular rhythm from the second year, the time required will always be manageable.
Thin out boldly
Although deadwood is cut out immediately during the vegetation phase if necessary, it should always be thinned out immediately after sprouting in spring. Due to the large number of fresh shoots, young leaves and sprouting buds, diseased, dried up and puny remains are now particularly noticeable. Thinning is now unavoidable, not only from an aesthetic point of view. It is important that light and air reach all regions of the tree, otherwise it will bare despite a topiary.
- Remove crossing branches
- Completely cut off too thin, obviously diseased shoots
- Cut off all dead branches
- Remove unwanted twigs and shoots below the crowns
Last but not least, steep erect water shoots that come from the root area should be uprooted. Just cutting them off only sporadically keeps them away. During the course of the season, they sprout again and again from the remaining plant remains.
Proper care after the cut
After pruning and topiary, an olive tree needs special attention for a while. So that he can start the new season well prepared, he should recover from the stress of moving from the winter quarters and the cut. For a short phase, the need for water and nutrients increases. Therefore, water the olive tree generously and add a phosphate-rich liquid fertilizer. Do not expose the tree to the blazing sun just yet. For 8 to 14 days it should acclimate in a sheltered, semi-shady place on the balcony. After this little recovery period, you enter the normal care protocol.
Properly cut olive tree as bonsai
In der fernöstlichen Gartenkunst sind bizarre Formen sehr beliebt. Diesem Wunsch kommt ein Olivenbaum mit seinem spektakulären Habitus, in Verbindung mit einem langsamen Wachstum, sehr entgegen. Angepflanzt in einer dekorativen Schale, liegt der Fokus auf dem richtigen Schnitt, um dem mediterranen Ölbaum eine zierliche Wuchsform abzutrotzen. Selbst dem Laien dürfte klar sein, dass es in diesem Fall nicht mit einem einmaligen Schnitt im Frühjahr getan ist. Vielmehr lautet das Motto: Im richtigen Verhältnis schneiden und gedeihen lassen.
- Von Mai bis September alle 6 bis 8 Wochen den Olivenbaum schneiden
- Zweige herausschneiden, die aus der Form wachsen
- Niemals alle jungen Triebe zugleich entfernen
- Prinzipiell gedeiht kein stärkerer Ast oberhalb eines dünneren Zweiges
- Wo 5 bis 7 neue Blätter gewachsen sind, wird der Trieb auf 2 bis 3 eingekürzt
Hinsichtlich der eigentlichen Schnittführung besteht kein Unterschied zur Anleitung für einen großen Olivenbaum. Ähnlich wie bei den ‚großen Brüdern‘ im Kübel, ist eine regelmäßige Routine von Bedeutung. Nur dann wird auf Dauer die filigrane Verzweigung erzielt.
Blattschnitt
Diese Schnittvariante verfolgt das Ziel, weitere Seitentriebe hervorzulocken und gleichzeitig die Feinverzweigung zu forcieren. Darüber hinaus bilden sich daran anschließend kleinere Blätter, was dem zierlichen Habitus insgesamt entgegenkommt. Im Frühsommer, wenn der Saftfluss in Gang gekommen ist, werden alle Blätter in der Mitte des Stiels abgeschnitten. Ein kleiner Rest des Blattstiels muss am Ast verbleiben, damit die Knospe keinen Schaden nimmt. Er fällt später von alleine ab, wenn die Knospe austreibt. Aus diesem Grund dürfen die Blätter nicht abgerissen werden, was den Vorgang erheblich erleichtern würde. Da im Ergebnis die Photosynthese des Olivenbaums vollständig zum Erliegen kommt, setzt sich der Überlebensmechanismus in Gang. So schnell es irgend geht, treibt der entlaubte Bonsai wieder aus; dieses Mal mit den erwünschten kleineren Blättern.
Da ein Blattschnitt das Erscheinungsbild des Bonsais für einige Zeit stark beeinträchtigt, wird diese Methode nur ab und zu in den jungen Jahren durchgeführt. Gedeiht das Laub in der angestrebten Miniaturform, erübrigt sich die radikale Schnitt-Technik ohnehin.
Drahten festigt die Wirkung des Schnitts
Während der gesamten Wachstumsphase wird ein Olivenbaum in die Höhe streben. Mittels Form- und Blattschnitt nimmt der Bonsaigärtner einen regulierenden Einfluss auf diesen Wachstumsdrang. Bedient er sich zusätzlich der Kunst des Drahtens, verbessert sich die Aussicht auf die Schaffung einer dreidimensionalen Mini-Skulptur, die exakt dem natürlich gewachsenen Olivenbaum entspricht. Nach dem ersten Rückschnitt im Frühjahr kommt daher ein geeigneter Aluminiumdraht zum Einsatz. Dieser wird locker im 45 Grad Winkel um die zu formenden Triebe gewickelt. Die Knospen und Blätter kommen dabei nicht in Berührung mit dem Draht. Spätestens nach 4 bis 6 Wochen – rechtzeitig vor dem nächsten Schnitt – wird der Draht wieder entfernt.
Schnitt der Wurzeln
In contrast to the normal olive tree, the pruning of a bonsai extends to the root area. Every 2 to 3 years the tree no longer finds enough space in the bowl and is eventually repotted. The bonsai gardener uses this opportunity to shape the root system.
- The perfect time is in the spring before the new shoots begin
- The length of the new bonsai pot corresponds to approx. 75% of the tree height
- The olive tree is lifted out of the previous bowl
- Shorten the roots so that a harmonious relationship to the crown is created
- Some root tips are left uncut to preserve water absorption
- 2/3 of old bonsai soil is exchanged for fresh substrate
Root cutting and repotting mean an enormous strain on the bonsai olive tree. The gardener takes this into account and does not cut the crown area for the next 4 weeks and at the same time refrains from wiring.
Conclusion
With the help of professional instructions, pruning an olive tree becomes an easy exercise. If this important care measure is carried out regularly at the right time in spring, the Mediterranean tree will thank you with richly branched, healthy growth. If you thin it out regularly as well, you will create a loyal container plant for many years to come. The venerable cultivated tree is also recommended as a spectacular bonsai, which attracts everyone’s attention with its bizarre habit. In this form, the regular blend gains additional importance. If you heed a few central aspects, the right pruning care will always steer the olive tree in the desired direction.